Saturday, December 30, 2023

Free GDB IDE : The Visual GNU Project Debugger

Yes.  It is FREE!

And, yes, it is Open Source!

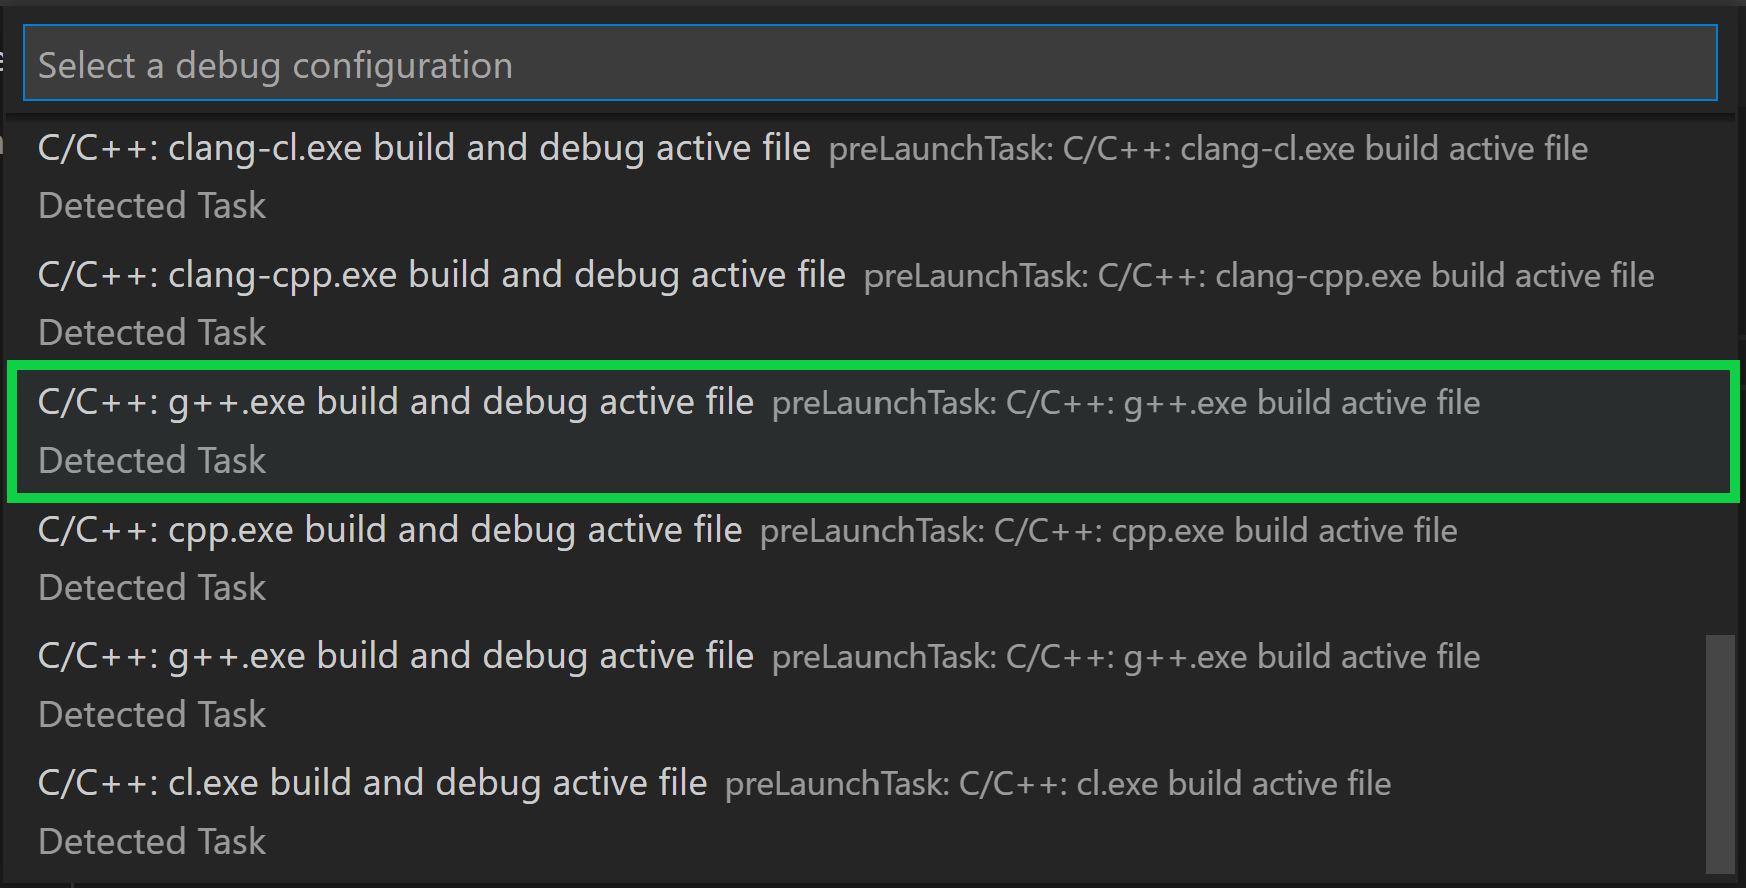
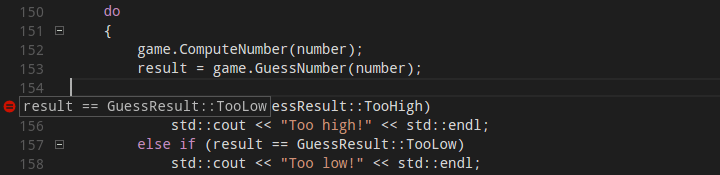
A tool to help you visualize the code you are debugging.  Watch all those local variables -- global variables.  Those Call Stack?  Visualize all of them while you Step Through, Step In, and Step Out of each line on your code.

Last time I had this experience was back in college using the Universities copy of Visual Basic as I debug my VB school projects.

Thanks this Open Source tool, I can do it again on my Open Source C++ project.  Yes, debugging a C++ code with a visual tool!  How great is that?

So, which is this that lets you visually debug your C++ code?  None other than Visual Studio Code. Yep.  That open source Visual Studio from Microsoft.

Wait.  Don't close this tab!  Hear me out.

You can use it to compile your C++ project.  Yes, even if your code is using GNU GCC.  You can even use it to compile with makefile.


But what I'm really excited is visual debugging of C++ code.


The articles been out since May 2020 and it's only now that I've learned about this as my Open Source C++ project is starting to be more complicated and been harder and harder to debug with every new feature being added.

Who would have thought that one day you can use GNU GCC and GNU GDB with Visual Studio? -- well Visual Studio Code.  Not me.

I'd like to think that it's all thanks to people who have pushed Free and Open Source Software, especially rms.

Happy hacking!

~creek23

Sunday, May 28, 2023

Kage Studio: 2D Animation Software

Kage Studio is a 2D vector animation software that lets you create vector and even hand drawn cartoons and animations. It is free to use and open source as well.

Overview

Kage Studio is a 2D animation software. It is an open-source software developed by a lone developer, me. Kage Studio aims to provide a simple and user-friendly platform for creating 2D animations. It includes features such as onion skinning, keyframes, layer management, and the ability to import PNG files. Kage Studio supports Windows, Mac, and Linux operating systems. As an open-source software, its source code is freely available for users to access, modify, and distribute.

Kage Studio v0.7.221227

System Requirements

Memory

If your Operating System can comfortably and smoothly run Windows 10 or 11, Mac OS 12 Monterey, or Ubuntu 20.04 Focal Fosa, you should be fine.  Kage Studio has a memory footprint of 50MB.

Disk Space

Kage Studio itself  is just a little over 2MB, but together with Gtkmm library and FFMPEG,  Kage Studio would require about 120MB of disk space,

Admin Access

Admin privilege is not required on Mac, and is optional for Windows and Linux.  Read more on Installation.

Installation

Windows

On Windows, you can down the ZIP file and simply extract the content on a folder access Kage Studio from that directory each time you need to use it.  The Installer would require admin privilege to install shortcut to Start Menu and associate KSF file to open with Kage Studio.

Mac

On Mac, the APP file can be ran without admin access.

Linux

On GNU/Linux, you don't need admin privilege to compile the source code and use Kage Studio, but the DEB package for Debian and Ubuntu distro would to run

sudo dpkg -i kagestudio_{version}_amd64.deb

Features
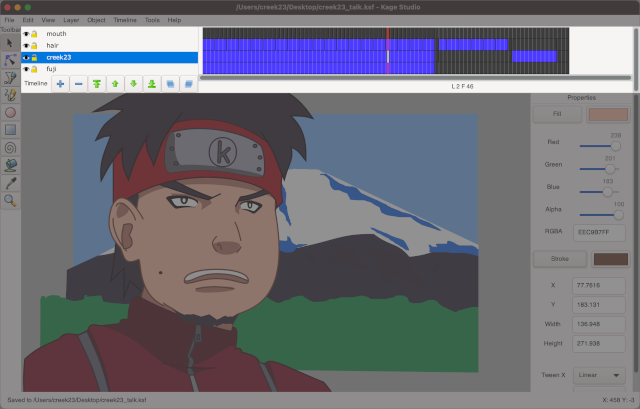
Kage Studio's Timeline Pane

Keyframe

Keyframes are specific frames within an animation where a change in an object's property or attribute occurs. They mark important points in the animation timeline that define the start and end of a transition or movement.

In animation, instead of drawing every single frame, animators create keyframes to represent significant moments in an object's movement or transformation. These keyframes serve as reference points from which the Kage Studio interpolates and generates the intermediate frames to create smooth animation between the keyframes.

Keyframes can be used to control various attributes of an object, such as position, scale, opacity, and color. By placing keyframes at specific intervals, animators can define complex movements, transformations, and effects within an animation.

Tweening

Tween, short for "in-between", is a technique used in animation to create smooth transitions between keyframes. It involves generating intermediate frames automatically based on the keyframes set by the animator.

When animating, animators typically define keyframes that represent the most important positions or poses in an animation sequence. Tweening fills in the gaps between these keyframes by automatically generating the frames needed to create a smooth transition from one keyframe to another.

There are different types of tweening methods used in animation:

Positional Tween

This type of tweening interpolates the position of an object between keyframes, smoothly transitioning it from one point to another. It calculates the in-between positions based on the distance and timing specified by the animator.

Tweening saves animators from having to manually draw every frame in an animation sequence, significantly reducing the workload. It helps create seamless and fluid motion, making animations appear more natural and polished.

Kage Studio includes built-in tweening capabilities that automate the generation of intermediate frames. Animators can specify the duration and easing functions for the transitions to control the timing and style of the tweens.

Shape Tween

Shape tweening is used for morphing between different shapes or forms. It allows animators to transform one shape into another gradually, creating fluid morphing effects.

Color Tweening

Color tweening is used to create gradual color transitions or fades between different colors. It enables animators to smoothly change the color properties of objects over time.

Alpha Tweening

Alpha tweening, or opacity tweening, allows animators to smoothly adjust the transparency or opacity of an object, creating gradual fade-in or fade-out effects.

Onion Skinning

Onion skinning is a technique used in animation that allows artists to see multiple frames or keyframes simultaneously. It is called "onion skinning" because the frames are overlaid on top of each other like layers of an onion.

With onion skinning, artists can see the previous and/or subsequent frames as a reference while working on the current frame. This visual aid helps in maintaining consistency in movements, timing, and spacing during the animation process.

Typically, onion skinning shows the previous and next frames as translucent outlines or silhouettes, with the current frame being the one actively worked on. This allows animators to compare the current frame with adjacent frames, making it easier to create smooth transitions and maintain the desired motion.

By enabling animators to see multiple frames at once, onion skinning helps in achieving fluid and natural-looking animations. It is a valuable feature in animation software for ensuring accurate movement and motion flow.

Layer Management

Layer management allows users to organize and control the stacking order of visual elements within Kage Studio.  It provides a way to manage and arrange different elements of the animation on separate layers, similar to how transparent sheets are stacked in traditional hand-drawn animation.

In animation, each layer represents a separate level or plane where specific elements or assets are placed. For example, you may have a layer for the background, a layer for characters, a layer for special effects, and so on. By separating elements onto different layers, animators can manipulate and animate them independently while maintaining their relative positions.

Layer management offers several advantages in the animation process:

Organization

It helps keep the animation project structured and well-organized. Each layer can contain related elements, making it easier to locate and work with specific parts of the animation.

Control

Layers provide control over the visibility, opacity, and blending of elements. Users can adjust the order of layers to determine how elements interact with each other visually.

Efficiency

Working with layers allows animators to make changes or adjustments to specific elements without affecting the rest of the animation. This saves time and effort by isolating modifications to specific layers.

Flexibility

Layers enable animators to create complex scenes by combining and separating elements as needed. Elements on separate layers can be independently animated, providing flexibility in the animation process.

Export to HTML5

Once you are done with your animation, or even just a single frame drawing, you can export your artwork to HTML5 and have it rendered on your webpage and make it alive with your animation.

Your drawing will be converted into JavaScript to render on HTML5 Canvas.  And most browser already supports HTML5, no need for third-party plugin like back in the day where you have to install Flash Player and such.

This means, your animation will be viewable on both Desktop and Mobile (smartphones, of course).

Export Video

Thanks to FFMPEG, Kage Studio can export to just about any video format.  Although, as of v0.7.22, Kage Studio exports to AVI video format.  But if you compile the source code now, you will be able to export to MP4, Matroska MKV, Quicktime MOV, and OGG.

Export PNG

You can also use Kage Studio to export your drawings to PNG and maybe use it on 2D Game -- here's a tutorial on how to use Kage Studio to create your game spritesheet.
Exporting to Spritesheet

Export SVG

Just as exporting to HTML5, you can export to SVG and use the SVG on your webpage.

Export KonsolScript

Yes, you can use Kage Studio to create your game cutscenes and export to KonsolScript.  After all Kage Studio started as a tool for use with Quixie and KonsolScript.

Summary

  • Kage Studio is multiplatform and runs on Windows, Mac, & GNU/Linux.
  • Kage Studio is completely free and open source.  Free as in free beer, and free as in freedom.
  • Lightweight with just 50MB of memory footprint 
  • Kage Studio supports tweening which is a vital technique in animation that enables the creation of smooth and appealing motion between keyframes, enhancing the overall quality and efficiency of the animation process.
  • Kage Studio supports Layer management that enhances the workflow and provides control over the visual composition of an animation. It enables animators to create intricate and visually appealing animations with ease.
  • With Kage Studio you can create drawings, 2D animations, and 2D game sprites.
  • It is a beginner friendly 2D animation tool perfect for aspiring animators, with easy PNG import and multiple export capabilities.
Monday, February 6, 2023

How to package your Gtk App for Mac

Preface

Couldn't get the gtk-mac-bundler to work so I had to package my Gtk app on my own. searching the internet for information.

So how do you package Gtk app for Mac distribution? Luckily, a guy on Stackoverflow asked the same question.  With no one having the answer, he answered his own question.  He created a blog on a website that's long gone.  Thanks to Wayback Machine, the information is preserved.  Somewhat.

Thanks to danivdwerf, I was able to package Kage Studio for Mac!

One learning from this activity is the copying of Gtk library to the App.  And having to modify the copied libraries to actually access the same libraries already copied inside the App.

danivdwerf indicated on his blogpost that he had to create a shell script so he doesn't have to do the same manually in the future.  My concern was,  Gtk library is always updating, and I will have to modify the shell script each time.

So, I decided to create a python script to generate the shell script itself.

How to package your Gtk App for Mac

Automatically creating the App file is a work in progress but currently, simply run this line on Terminal

python3 copylib.py yourapp

You should have a shell script called, copylib_yourapp.sh, which you can use to copy all the Gtk libraries and modifying them for your App.

Final Words

Get a copy of copylib.py on Gtk-App-Builder.

Happy hacking!

~creek23

Sunday, February 5, 2023

Create ICNS (icons for Mac) on GIMP

It's official! Gimp supports ICNS! 

Well, it's not yet officially "official".  But beta build of Gimp already supports ICNS file format.

Yes, the file format for icons that Mac OS uses.

Open, Create, Edit ICNS with Gimp 2.99.14 (the beta build I tested it on).  As of posting, official Gimp is at 2.10-32.

It will also tell you if your icon size is supported or not! Sweet!  No need to check the internet if a size is supported.

So, I created ICNS for Kage Studio with Gimp 2.99.  I tested 16x16, 18x18, 24x24, 32x32, 36x36, 48x48, 64x64, 128x128, 256x256, and 512x512.

It was unreal using Kage Studio to create the icon for Kage Studio.  Then exporting the Kage Studio icon from Kage Studio to PNG which Gimp obviously supports.  Then use Gimp to downscale from high resolution to all the dimensions that ICNS supports.

Not sure who to credit for supporting the file format, maybe everyone on the ticket that was raised 2 years ago by cardcraft, that was finally closed just 3mos ago.

I so love Free and Open Source Software.  What a time to be alive.

~creek23

Sunday, January 8, 2023

Where to snowboard on Whistler for free?

It's weird that this information isn't actually available on the Internet.  Rather, the information on the Internet are outdated. Maybe a locals only information? 🤔


Where can you snowboard on Whistler for free?

That depends on your skill level.  And this post is for the beginners and somewhat intermediate who just want to snowboard all day without having to pay day pass which costs around 87~219 CAD.

The answer, Whistler Blackcomb, of course.

Not sure if the crew manning the Whistler Blackcomb ski resort are just letting non-pass holders to go snowboarding for free but it is! It is FREE to snowboard the beginner and intermediate are of Whistler Blackcomb.

Free Spot?

Right at the base of Whistler Blackcomb,  just around the Blackcomb gondola.  One side for beginners, the other side for somewhat intermediate. Both spot, for FREE!

Free Lift?

Their gondola still requires pass, but the Magic Chair lift is FREE.  But it's only going to bring you up to Excalibur gondola.  But then again, it will let you snowboard for free on the currently considered number one spots to ski and snowboard.

Free Parking?

Parking lot 6 is the closest parking to the free area and it's also FREE.  That is why it's also the first to get filled up.

Next closest parking are lot 1, lot 2 and lot 3 but requires payment until 5pm which becomes free afterwards.

Still cannot find parking space?  Head over to parking lot 4 and lot 5.  These parking lots are not easily spotted unlike 1, 2 and 3, even though signs are there, which makes it easy to miss.

Parking lot 7 and lot 8 are also free but is far from the free beginner, intermediate area.  You don't wanna walk in ski/snowboard boots with that distance.

For paid parking, here's a quick tip, pay online via their app to avoid the line.

Free Food?

You're pushing it.  If you parked by lot 6, be sure to bring your own food and drinks.  Park lot 6 is so accessible, you can sneak a quick snack by the parking and get back to the intermediate spot.


Thursday, September 22, 2022

NEW Spritesheet Tool in town!

Ever heard of the 2D animation tool called, Kage Studio?  It has the Macromedia Flash feel to it.  Yes, Macromedia Flash -- not Adobe Animate.

Kage Studio is a free vector art animation tool which handles vector editing pretty much like Inkscape.  You draw the shapes and modify them with Select Tool and/or Node Tool.

I'll write a different article on how to use this free animation tool, but for now, let's focus on how we can make game art out of this tool.

Kage Studio is free and open source, currently hosted on SourceForge so, nothing to worry.  Now, download and install Kage Studio then open the demo file included with it, called demo.ksf

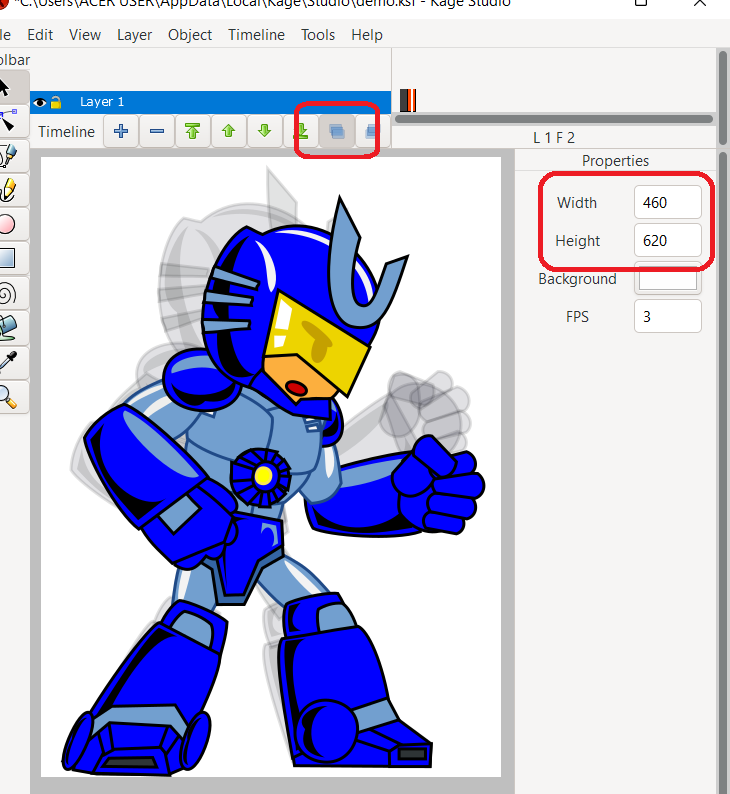
Adjust the Width and Height to fit the current artwork.  Make note of the Width and Height you set -- you might need it on your code to specify the width and height of each frame on your spritesheet.

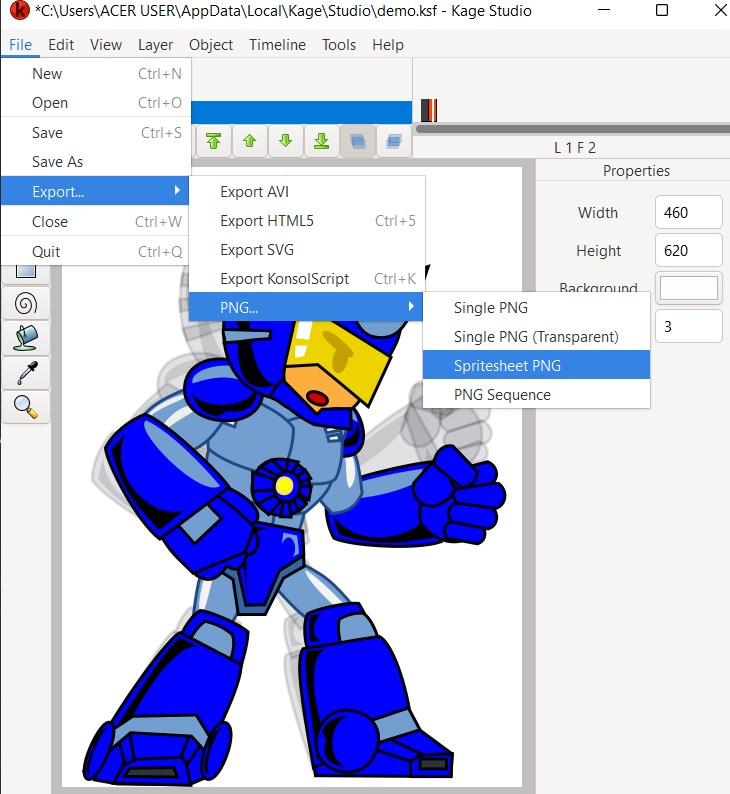
Now. you are ready to export it as Spritesheet.  Click on File -> Export -> PNG... Spritesheet PNG.

Set the filename then check the Spritesheet for your self.

Load that to your game engine and see it get animated.

I've made a quick test with Phaser.  It should be doable with any other game engines.

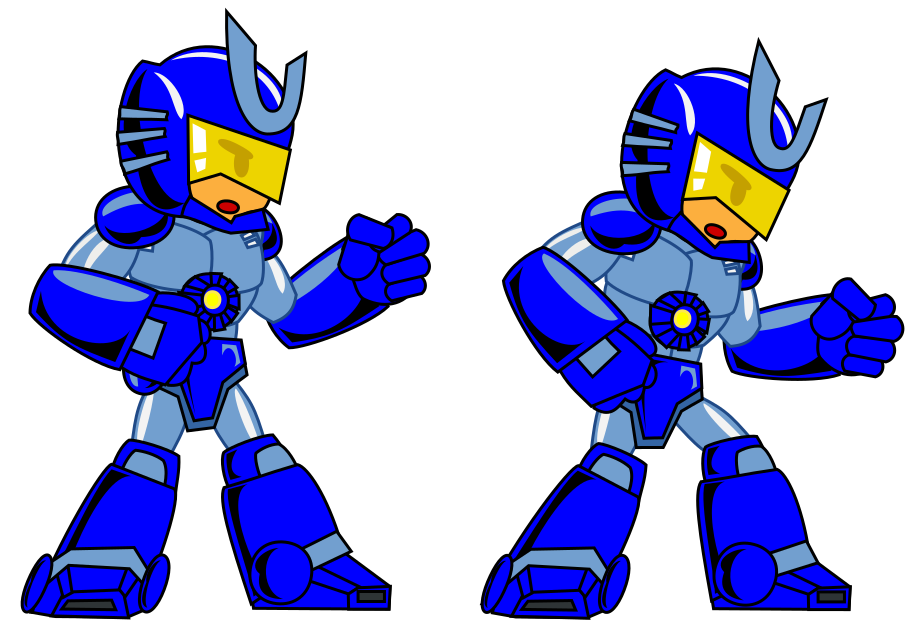
With Kage Studio, you can have your sprite animation previewed inside the tool before loading inside your game.  Even reuse your sprites to create your cut scenes or cinematic and vice versa.


~creek23

Saturday, March 20, 2021

[SOLUTION] Cannot Create Foreign Key

Been a long while since I last needed to have Foreign Key in my Database.

Much of my applications are not so complex that I don't bother employ a Foreign Key.

Now that I have to, it took me about three whole hours figuring out the problem.

I cannot create Foreign Key with HeidiSQL!

I've been using HeidiSQL for over ten years now.  It's only now that I faced problem with this MySQL GUI.

My latest Wamp Server uses MariaDB.

Thinking it could be MariaDB having a problem and not HeidiSQL, I tried using MySQL instead.

Still, with MySQL, I could not successfully create Foreign Key!  And I've been pulling my hairs off!

Somehow, this problem has been discussed over at HeidiSQL forums a year ago.  Even the author of HeidiSQL couldn't figure out why because the problem isn't happening on his side.

Luckily, a user named, Patsy, figured out why.

For some reason, my Wamp Server used MyISAM as default Table Engine instead of the more common, InnoDB.

So, in the end, it wasn't a bug in HeidiSQL.  Neither a bug in MariaDB nor MySQL.

It was a compatibility problem with MyISAM not being able to support Foreign Key

Hope this blog post will save you hours of hair pulling.

Happy hacking!

~creek23

Friday, April 3, 2020

Tatsulok Lyrics by Buklod

Been searching for this for a while.  Sadly, most Lyric websites either have the wrong lyrics, or are using Bamboo's version.

To give justice to the song, I listened to the original which can be heard on Youtube, thanks to the uploader, Rvmer Rivera.  Here's the original lyrics released in 1989.

Totoy bilisan mo, bilisan mo ang takbo
Ilagan ang mga bombang nakatutok sa ulo mo
Totoy tumalon ka, dumapa kung kailangan
At baka tamaan pa ng mga balang ligaw

Totoy makinig ka, wag nang magpa-gabi
Baka pagkamalan pa't humandusay dyan sa tabi
Totoy alam mo ba kung ano ang puno't dulo
Ng di matapos-tapos na kaguluhang ito

Hindi pula't dilaw tunay na magkalaban
Ang kulay at tatak ay di syang dahilan
Hangga't mas marami ang lugmok sa kahirapan
At ang hustisya ay para lang sa mayaman

Habang may tatsulok at sila ang nasa tuktok
Hindi matatapos itong gulo

Hindi ligtas ang hininga ng kay raming mga tao
At ang dating munting bukid, ngayo'y sementeryo
Totoy kumilos ka, baliktarin ang tatsulok
Katulad mong mga dukha ang ilagay mo sa tuktok

Hindi pula't dilaw tunay na magkalaban
Ang kulay at tatak ay di syang dahilan
Hangga't mas marami ang lugmok sa kahirapan
At ang hustisya ay para lang sa mayaman

Habang may tatsulok at sila ang nasa tuktok
Hindi matatapos itong gulo
Habang may tatsulok at sila ang nasa tuktok
Hindi matatapos itong gulo


Happy Singing!

Monday, July 29, 2019

Fake Arduino UNO cannot be detected by Windows

First of, there's nothing wrong with a fake Arduino -- we all know that Arduino is open source and everyone can create their own copy with the blueprint from Arduino website.

Okay, now onto your problem.

I too bought a fake Arduino because I'm cheap.
I got mine from Lazada.  And the item cannot be detected by Windows 7.

I was able to find the USB Driver from another website (Hobbyists.co.nz) but it took thorough searching on the internet.  So, I hope this blog post will help boost that article up in the search results.

In any case that the website will be gone, hopefully not,  I'm copying the link to the USB Driver here -- which is hosted by Arduined.eu.  Simply install then off you go.

Happy hacking!
~creek23

Thursday, May 17, 2018

Game Boy Advance Development 101: Compiling Tank Advance

If you've happen to download Tank Advance source code from Loirak Development, chances are you're having a problem compiling a working GBA file with devkitPro.


That's because of the compiler.


The pre-compiled GBA file inside the Tank Advance ZIP file was compiled 2002 -- that's more than a decade and a half.  Last 2002, GCC was just version 3.  As of this writing, devkitPro is using GCC version 7.


Without much further ado, use the following lines in MSYS2:
arm-none-eabi-gcc -c gfx.c -mthumb-interwork -mthumb -O2 -o gfx.o
arm-none-eabi-gcc -c main.c -mthumb-interwork -mthumb -O2 -o main.o
arm-none-eabi-gcc main.o gfx.o -mthumb-interwork -mthumb -specs=gba.specs -o tank.elf
arm-none-eabi-objcopy -v -O binary tank.elf tank.gba


If successful, you should have a freshly compiled Tank Advance and you can start changing the code to understand how it works so you can start writing your own Game Boy Advance game. :)


Happy GBA deving!


~creek23

Friday, May 4, 2018

Game Boy Advance Retro Gaming with Supercard

Why Retro Gaming?

On my early 30s now, and such a nostalgia seeing game boy games being played with Smart Phone.  But the little boy inside me still wants to play these games in a real Game Boy device.


How to do Retro Gaming?

Option 1, buy Chinese knock-off game device that natively runs emulators which then runs your ROM (the game file of your favorite Game Boy game).  Amazon and Ebay lists Game Boy Console but I'm not sure on their authenticity -- so, buy at your own risk!
 
Option 2, buy used Game Boy and used games -- a little harder approach but I was able to find one used Game Boy Advance SP and a used game which isn't my kind of game.
 
So, I had to resort to a Supercard, a cartridge that used SD Card (to which you save your ROM and plays on your Game Boy) -- this Supercard was a hit some 15 years ago when ROMs plagued the Internet.  I learned about this when I was learning how to write a game for Game Boy Advance using free Game Boy SDK -- thanks to Jonathan Harbour's Unofficial Guide!
 
This Supercard only costs about $18 USD which is available online -- the card is also supported by NDS.


Common Problems and Solutions

Where to find ROM -- Internet is still plagued with ROMs, and you are not going to get those links from me.


"not find SD" --  there could be lots of reasons and these are possible solutions:
  • check that your SD card IS NOT SDHC card; if it is, buy a new one -- the SD one!
  • check that your SD card is formatted with FAT and NOT FAT32; it it is, reformat it to FAT!
  • check that your SD card is 2GB and NOT MORE THAN 2G; if it is, buy a new 2GB one.
Cannot read ROM -- you need to convert the ROM to be compatible with Supercard;  I found version 2.71 dated 2010.03.25

Cannot SAVE game -- make sure to Run Supercard converter as Administrator to enable SAVE in your ROM

Conclusion

That's pretty much it!  Comment down for questions and if you happen to have additional information, kindly share them in comments :) Happy Retro Gaming! 

~creek23
 
DISCLAIMER: Yes, my approach is technically "Piracy" and I'm not trying to justify -- it's just that these games are not being sold anymore.  So, NO, I'm not promoting piracy.  Read more on Nintendo's stand on ROMs.


SIDE NOTE:  Nintendo might be able to make money if it had a ROM store much like Apple's App Store or Google's Play Store since it already re-released NES, and SNES -- might as well re-release a WIFI-enabled Game Boy! :)
 

Saturday, April 16, 2016

Lenovo VIBE K4 Note, ANTVR PhoneGlass, and Google Cardboard

So, Lenovo Philippines decided to sell their Lenovo VIBE K4 Note with free VR glass.  Yes, you read that right -- a FREE Virtual Reality glass for every new Lenovo VIBE K4 Note.

To tell you the truth, I didn't bother with the phone's specs.  I just wanted to have my own VR glass!  So, yeah, this is not a post about a phone review.  Though, I'm generally okay with the phone given the price of US$220~ (some store sells it for US$230) that it already comes with VR glass.  So, there's that.

Now onto the VR glass.

Nothing fancy, really.  It's just a plastic version of Google Cardboard with head strap.  Which, for someone like me who really needs to experience this VR thing that's been trending for quite awhile now, it's my kind of poor man's Occulus Rift. I say, hell yeah! I finally have an Occulus Rift! -- a cheap one of course but to hell with CEOs saying VR for the mass market will take a longer while.

So how does it work?

Like Google Cardboard, you will have to put the phone in front of the glass, clipped into place -- which is kind of a lousy engineering if you ask me.  Placing the phone into place by having it clipped comes the risk of the phone falling off if not properly clipped -- I mean, it took me awhile to actually safely clip the phone.  I was thinking, it would have been better if you just slide it on the side of the VR glass and have some locking mechanism to lock it into place -- maybe, slide it on then clip for locking.  I hope Lenovo would be reading this and tap ANTVR to revise the glass with my inputs.

Demo, anyone?

Sadly, the phone does not have videos or apps ready for demo purposes.  So I had to search Google Playstore only to find apps that are compatible only to Google Cardboard.

Good thing though that VR Roller Coaster app has the same configuration that fits Lenovo's ANTVR.

So, these are the steps that configured Lenovo's ANTVR for VR apps that were designed for Google Cardboard:
1. Install Google Cardboard
2. Install VR Roller Coaster
3. Run VR Roller Coaster, select any of the 2 sample rides, then click configure.
4. Then focus the phone to the image below, which I got from the internet by simply googling: 'qr code "vr roller coaster"'
VR Roller Coaster configuration
I know it's rather small but VIBE K4 Note can actually scan it and configure VR Roller Coaster's view that will fit Lenovo's ANTVR glass.

(This post was written at 3AM, just after a few hours of tinkering with ANTVR; if something is not clear, put it in the comments below :) -- if everything works, please do let me know as well by commenting)

~creek23


Saturday, April 11, 2015

[Sk8Factory/Mimic Review] Skateboard manufacturing scum

I've been wanting to write this review to a skateboard deck manufacturer called Sk8 Factory. -- btw, they also own Mimic Skateboards.  Since there is no real way of informing other possible customers of these sub-standard manufacturer, I really think this review is needed to be posted to keep this money-sucking sub-standard Sk8 Factory away from the industry.

Whatever you do, DO NOT BUY from Sk8Factory (or Mimic Skateboards)!!!

They sell cheap because THEIR PRODUCTS ARE CHEAP!

The skateboard decks that Sk8 Factory (or Mimic Skateboards) produces gets easily delaminated.  This is due to their lack of experience in having a dyed ply mixed in the 7-ply deck -- the paint/color they use in dying the ply causes the dyed ply to not properly bind with the other plies.  This other skater's review shows that Sk8Factory (or Mimic Skateboards) were originally not using dyed ply.

Also, they only produce deck on demand but waits for a bulk batch to maximize the labor cost -- which is understandable to any business-minded individuals BUT this is a deadly combination for your skateboard decks.  After a month of production, they will start shipping your products hoping they cure while being delivered.  They need to deliver the product soonest the graphics are dried because you as their client have been waiting months when they were still waiting for other others.  And here you are so gullible and eager to test their product upon receiving it not knowing that the boards have not cured to its maximum curing time.  You'll only realize once it's all too late.

Their price is too good to be true because they are experimenting on the products that you will order from them.  So, whatever you do, DO NOT BUY anything from Sk8Factory or from Mimic Skateboards!

There's another video review which is basically a shallow review, IMHO.  The client is (or was) happy because finally his orders came in with his own graphics.  That same reviewer has a second video review where it shows how the board works, but as you can see the skater is kind of beginner that any sub-standard deck would probably pass his standards -- the reviewer can't even pop the board proper to level a proper ollie.


The only thing they got right is that their graphics doesn't easily come off like most brands.  But would that actually matter to you if the wood won't even last?

Tuesday, November 11, 2014

[Android Studio] Error : Failed to find: com.android.support

It's nice that Google is trying to make a full-fledged Android Authoring Software, complete with what is expected from an authoring tool.  But as of now, the tool itself is in Beta which has a few hiccups hidden somewhere, and one of this is not being able to compile an Android Project. o_o

Like, really?

So if you, like me, had encountered this problem saying:
Error : Failed to find: com.android.support
Relax and open SDK Manager then install the Android Support Repository and/or Android Support Library.  Better yet, install those two. :)

Upon restart of Android Studio, that problem should go away.

Happy hacking!

~creek23

Thursday, October 9, 2014

[FFMPEG] Adjust video volume

Before anything else, here's a quick disclaimer:  I do not promote the use of torrent for downloading movies you do not currently own.  Yes, I do download movies but only if I have a DVD/Bluray copy of it.  The only reason I download it so I would have a soft copy -- yes, I suck at ripping DVD/Blurays.

Okay.  Now, onto the issue at hand.

It seems that this torrent group called YIFY is famous among torrent freaks because of quality Bluray rips packed in very small HD files.  Sadly, YIFY configured their rips to lessen the quality of audio.  Which is not a problem for people watching the video on their computers since VLC Media Player can double the movie's volume and everybody's happy.

Well, not quite.

People who have LED TVs happen to enjoy the quality of the movie they downloaded by watching it on their 40~50in TVs.  And it so happen that their TVs doesn't have the feature VLC Media Player has (doubling the volume) -- so they are stuck with the audio quality that YIFY offers with their small-size HD movies.

So how do you fix it?

Have I mentioned my disclaimer, yet?

Anyway, let's use FFMPEG! Just type this into your Command Prompt:

ffmpeg -i "input.mp4" -c:v copy -af "volume=10dB" "thanksToCreekCodes.mp4"

Above ffmpeg command should make sure that you should now have a louder audio while having the same video quality.

I'm pretty sure you understood my disclaimer right?  Well, happy viewing!

~creek23

Friday, May 24, 2013

Compiling Geany on Windows

Can't remember exactly how many times I've tried compiling Geany or even thought of trying to compile it on Windows.  But I remember that my last try was last 2011 -- about February or March.

It's been a while that I've been trying to find a stable and reliable free and open source (not to mention cross-platform) Source Code Editing software so I could strip it down to provide an IDE specifically functioning for my open source game creation project called KAGE.  Finally, -- finally! -- I successfully compiled it yesterday!

I know that Geany's project page has a how-to page for compiling it on Windows but I still had bumps along the way.  This tutorial is simply to compliment what seems to be missing in the official tutorial.

So, just a recap. You need to have this things done already:

Not sure if we also need the GtkMM for Scintilla, but I did have that installed on my machine before I tried compiling Geany for the last time.

Before we proceed, let's make sure that you had the contents of GCC and GTK+ under C:\libs directory.  And that C:\libs\bin is added on your %PATH%, as well as C:\libs\msys\1.0\bin.

Now, for the `complimentary' part of my tutorial.

First, download the Manifest file from Geany's Git repo, which was not included in the downloadable zipped source code.

Rename win32-config.h to config.h then change the content of makefile.win32 from

all: config.h
 $(MAKE) -C tagmanager/ctags -f makefile.win32
 $(MAKE) -C tagmanager/mio -f makefile.win32
 $(MAKE) -C tagmanager/src -f makefile.win32
 $(MAKE) -C scintilla -f makefile.win32
 $(MAKE) -C plugins -f makefile.win32
 $(MAKE) -C src -f makefile.win32

config.h: win32-config.h
 $(CP) $< $@


to this

all: $(MAKE) -C tagmanager/ctags -f makefile.win32
 $(MAKE) -C tagmanager/mio -f makefile.win32
 $(MAKE) -C tagmanager/src -f makefile.win32
 $(MAKE) -C scintilla -f makefile.win32
 $(MAKE) -C plugins -f makefile.win32
 $(MAKE) -C src -f makefile.win32


The reason behind is that, there seems to be wrong with the makefile that the command COPY thinks config.h is supposed to be a directory.

Now, open a command line then run cd to the directory where you extracted Geany's source code.

Finally, type-in: make -f makefile.win32

Wait for it to compile and you'll then end up a very fresh build of Geany on Windows.

~creek23

Friday, February 8, 2013

LMMS: Fixing distorted sound

So I have been casually using Linux Multimedia Studio, or LMMS, since 2010.  It is a really good free and open source alternative to FruityLoops.

I won't go detailing how great this tool is for digitally creating your music as I am assuming you bump onto this post already knowing what LMMS is.

One issue of this tool on Windows is that LMMS keeps distorting your (if I may) compositions, adding buzz and other weirdness to your music.

The problem is even added on its Troubleshooting page but it is still currently unanswered as of this post.

Luckily, the answer is actually already on its Forums posted by a fellow LMMS user, darkill.  And it's just waiting for someone to add it on LMMS' Wiki.

For archiving purposes (just in case the forums and/or the wiki won't be accessible), let me state the steps here on this post.

Open DirectX Diagnostic Tool
  1. Open a Command Prompt
  2. Type-in: dxdiag
  3. Check the tabs with labels "Sound1", "Sound2", etc.
  4. Check for the Driver's name (mine is STWRT.SYS)
  5. Take note of this now do the next steps 
Update LMMS Settings
  1. Run our favorite digital music authoring tool called LMMS :)
  2. Go to Edit -> Settings
  3. Now goto Audio Settings
  4. Change the Audio Interface to SDL (Simple DirectMedia Layer)
  5. Then specify your Driver's Name of your Audio Device on Settings for SDL
Now restart LMMS and hope that the distortion and other weirdness on your music is gone.

Happy composing!

~creek23

Sunday, August 26, 2012

Gimp 2.8 gzdirect problem

This simple solution should fix the problem: "The procedure entry point gzdirect could not be located in the dynamic link library zlib1.dll."

To non-programmers, this error message simply means that your  zlib1.dll is outdated and needs to be replaced.

Somehow, most (if not all) Gimp plugins are using gzdirect which is supposed to be available on  zlib1.dll.

Try checking C:\Windows\System32\ and look for zlib1.dll then rename it to something else, maybe something like  zlib1.dll.old.

So where to get the latest one?  It's actually installed along with Gimp 2.8, but since you have another  zlib1.dll on your Windows' System32 path, Windows is trying to load that copy instead of the copy that Gimp 2.8 has.

Now, re-run Gimp 2.8.

Happy Gimping!

Friday, August 10, 2012

Jenkins: Executing binary from Jenkins script

If anyone of you are having the same problem as detailed on Jenkins forum about not being able to execute any Windows executables from Jenkins Job configuration.  The reason might be that slave-agent.jnlp is running as a service -- and for whatever reason, Windows won't let it run other executables.  To verify if it is the case, try uninstalling the slave-agent.jnlp service -- to do so, use Google -- then try running slave-agent.jnlp as is (meaning, right after executing the code below).

javaws http://yourjenkins.com/computer/yourslaveIP/slave-agent.jnlp

If that didn't solve the problem, sorry but I currently don't have any other solution.

Friday, June 22, 2012

Screencasting with Android

Well, if you are already using the Screencast Video Recorder, there's no use of reading this -- but I'm betting you're not because you stumbled onto this tutorial.

First of all, I am not related to the said screencasting app and I am in no way endorsing it.  I haven't even tried that app yet because 1.) it's not supported on my low-end Android device and 2.) it's a paid app -- yes, I'm cheap, sue me. :P

So this tutorial is about creating a screencast of your Android device using a free and open source tools called Android Screen Capture (or AShot) and FFmpeg.  I should warn you that this tutorial is not for the fainthearted -- it's gonna be messy through setting these tools up, and through creating of the screencast video itself.

I'm going to assume you know what we mean by screencast.  And I'm going to assume you are using Windows on your PC.

To start, download the tools:
AShot - http://sourceforge.net/projects/ashot/files/latest/download
FFmpeg - http://ffmpeg.zeranoe.com/builds/win32/shared/ffmpeg-20120620-git-5a90e55-win32-shared.7z

Here's a very detailed tutorial of setting-up AShot, which I'm very glad not to write over again.  It talks about downloading Android SDK, which AShot uses to capture images from your Android device.  One quick note, however, is the copying of the three files, namely:
  • adb.exe
  • AdbWinApi.dll
  • AdbWinUsbApi.dll
from this directory: C:\Program Files\Android\android-sdk\platform-tools

to this directory: C:\Program Files\Android\android-sdk\tools

Again, simply COPY the three files and not MOVE from one to the other.

Lots of troubleshooting is also discussed on that page, so go thoroughly through that page if AShot won't seem to work.


At this stage, I'm assuming you already got AShot working and you're seeing the same image in your PC as what's on your Android device as shown in the photo above.  You might have also tried screencapturing, and saw a tiny little problem -- (aside from the low FPS which is already answered many times on that page mentioned) instead of a video output, AShot outputs a series of PNGs.  Here's where FFmpeg comes in.

The FFmpeg binary download is just a zip file that can easily be extracted by 7zip or WinRAR -- though, I prefer 7zip.

I'm going to assume you extracted it on the root of your computer in such a way that ffmpeg.exe will be in this path: C:\ffmpeg\bin

And I'm also going to assume that you set AShot to output screenshots on this path: C:\ashot\

Now, all you have to do is open a Command Prompt and type this:
cd c:\ashot\
c:\ffmpeg\bin\ffmpeg -f image2 -i screenshot_%05d.png screencast.avi


Then using any movie player -- I use VLC media player by the way -- you can now view your screencast.avi.

Lastly, if you want to adjust the FPS of your AVI, try adding -framerate X when executing ffmpeg, where X is your desired FPS.

Happy screencasting!

~creek23